
Need any help with blogging? I'll give you a few tips! HTML help coming soon!
HTML Help
People make HTML seem as if it's about as hard as turning an orange into an apple. But trust me, it may be a little tricky at first, but it's easy once you get the hang of it. I sound superior, don't I? :b Well, actually, I only know the basics, which are the following, so if somebody more experienced could give me a couple of lessons, I'd be appreciative.
Anyway, to work with HTML, it's a good idea to get up www.onlinehtmleditor.net because it gives you a preview of what you're doing, before you put it on your blog or wherever.
Colours in HTML
In HTML, colours look like this: #f1c232
That is yellow.
White is this: #ffffff
Black is this: #000000
It explains all of them at this link: LINK You can copy them from there when you're HTML-coding.
Making Picture Links
This is quite easy, and there are two ways to do it.
If you have a Blogger account (see the tutorial on making one below), draft a post, upload the picture you want to use, highlight it, click the "link" symbol above, make the link, go onto HTML mode, copy the HTML, paste it wherever you need it, and tada, you're done!
If you don't have a Blogger account, never fear, there's another option for you - a little trickier, though.
Upload your picture to www.tinypic.com and then copy the HTML code it gives you. Paste this on www.onlinehtmleditor.net and go to where in the code it says "www.tinypic.com" and change that into your link's URL, then copy the HTML code from Online HTML editor to wherever you need it, and, tada, you're done!
How To Make A Blog
You might ask, how do you make a blog in the first place? Well, that's what you're going to find out in 7 easy steps!
1. First, you have to go to blogger.com!

If you don't already have a blogger account or a gmail, then click sign up, where I squared in red. ;)
2. It will take you here!

Fill out everything there, as I started doing. :)
3. Then it will take you here.

Click "back to blogger" ^.^
4. It will take you here!

To keep your real name safe, choose the one which I squared in green and click where I squared in red.
5. It will take you here!

Choose what your display name will be, for instance, mine is ♑ SilverDawn ♑!
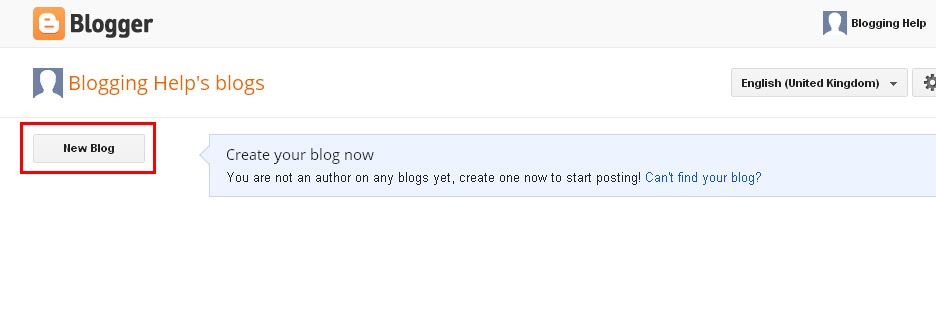
6. Then, once you've clicked "go to blogger" or whatever it says, it will take you to your Blogger Dashboard!

Click "New Blog" where I have squared in red!
7. This will pop up!

Type what you want to call your blog, what you want the URL/blog address to be, and which template you want to use. Note: all templates are customisable later. Then click "Create blog!"!
And voila! You have a blog!
How To Customise Your Blog
Now, the next thing you want to do is make your blog UNIQUE! :D
1. Click the little arrow next to the middle symbol, and then click "Template" where I have squared in red.

2. Then it will take you here!


2. It will take you here.
3. Then, this will pop up:


 4. Do you want there to be comment moderation? If so, click "always" instead of "never".


1. Go to Layout.

Click "edit" where I have circled in red.
2. This should pop up.

3. Once you've done that, click "save arrangement"!

1. First, you have to go to blogger.com!

If you don't already have a blogger account or a gmail, then click sign up, where I squared in red. ;)
2. It will take you here!

Fill out everything there, as I started doing. :)
3. Then it will take you here.

Click "back to blogger" ^.^
4. It will take you here!
To keep your real name safe, choose the one which I squared in green and click where I squared in red.
5. It will take you here!

Choose what your display name will be, for instance, mine is ♑ SilverDawn ♑!
6. Then, once you've clicked "go to blogger" or whatever it says, it will take you to your Blogger Dashboard!
Click "New Blog" where I have squared in red!
7. This will pop up!

Type what you want to call your blog, what you want the URL/blog address to be, and which template you want to use. Note: all templates are customisable later. Then click "Create blog!"!
And voila! You have a blog!
How To Customise Your Blog
Now, the next thing you want to do is make your blog UNIQUE! :D
1. Click the little arrow next to the middle symbol, and then click "Template" where I have squared in red.


I can't help you any more with this, you just have to fiddle around and find the background, colours, font, etc which suit YOU and your blog! :D Let your creativity flow!
How To Add A Header To Your Blog
Once you've made a banner on Microsoft Paint or some similar program, or asked me to make you one and got it off my Graphic Design page (hint, hint! :b) then you go to Layout.

2. It will take you here.

Click where I've sqaured in red ;)
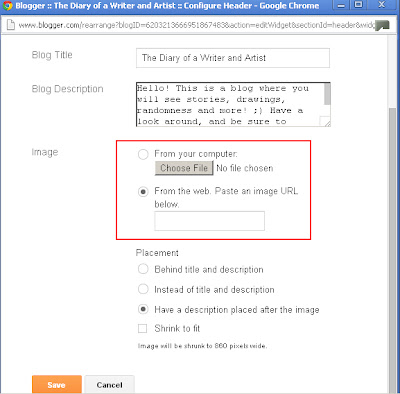
3. Then, this will pop up:
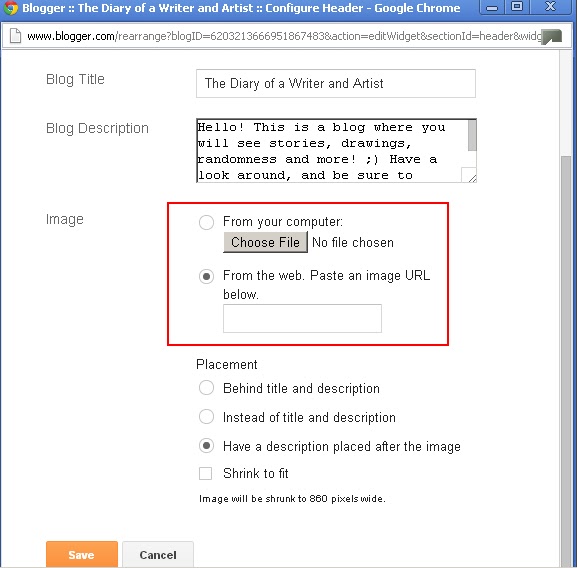
Choose which of the options you will use to upload your banner. (I have squared the options in red.) It will then start to load up. Make sure you click "shrink to fit"!
4. Once it has loaded, choose your header's placement! :)

Behind title and description if the header is a picture with no words, instead of title and description if you have a worded header, and in my case, have description placed after the image.
5. Then, click "save", and you're done! :D
Helpful Tips
Once you've made a blog, here are a few things you should do ;)
1. Go to settings.

2. Go to "posts and comments" :)
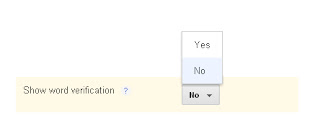
3. You know sometimes when you're commenting on a blog it comes up with a thing saying "Prove you're not a robot"? Well, here's how to stop it from appearing on yours! Where it says "Show word verification?" change it to say "no".


5. Do you want to add commenting rules to be sure that everyone behaves properly on your blog?
Click "add", where I have squared in red.
6. Type what you want the rules to be! Here's an example.

7. Once you've done all this, remember to click "save settings"!
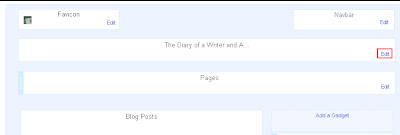
How To Add A Favicon
A lot of bloggers rack their brains very hard (I know form experience) to figure out how to add a favicon to there blog. The favicon is the little picture you see in the corner of the tab, next to the blog's name. For instance, mine is the same as my profile picture. Well, here's how!

Click "edit" where I have circled in red.
2. This should pop up.

Click "choose file".
3. Once you've done that, click "save arrangement"!

I hope this was helpful! Comment anything you're having trouble with, and I'll see if I can help!
That's really helpful!!!
ReplyDeleteCOoL!
I'm glad! :D
DeleteAnd thank you! ^.^
Indeed.
DeleteIt took me a while to figure out the Blogger functions...
It's so thought out!
ReplyDeleteSuper helpful to new bloggers ;)
ReplyDeleteThanks so much. That's so helpful. ;)
ReplyDeleteWell, I was just thinking how to add a mouse?? O:
I could barely figure out how to make a banner at first!
ReplyDeleteI looked all over for blog help...
ReplyDeleteThis would have been perfect! XD
Would you mind adding images to the 'Making Picture Links' part? It was really helpful, but when I tried to do it, it ended up a mess!
ReplyDelete